Skip table of contents

Configuration

Configurations ensure that the system reflects your business processes and requirements. By setting up these options correctly, you can:

  • Standardise data entry across teams

  • Control what appears on customer‑facing documents

  • Automate calculations such as charges or discounts

  • Maintain consistency across modules


Using the Screen

Using a Configuration Screen

Access

Each module in Latner such as Sales, Rental, Equipment, Service, Stock, Customers, Suppliers, Financials, and Security has its own Configuration menu. Within this menu, you’ll find a drop-down list of all configuration screens specific to that module.

For example:

  • In the Rental module, configuration screens may include settings for rental rates, packages, or setting up data relating Rental Contract / Quote changes such as Stand Downs, Cancellation.

  • In the Equipment module, configuration screens may include categories, fuel-types or reasons relating Equipment changes such as Transfers, Disposal, Adjustment.

Screens

There are two types of configuration screens in the system: Basic and Detailed.

Basic Configuration Screen

image-20251204-042958.png

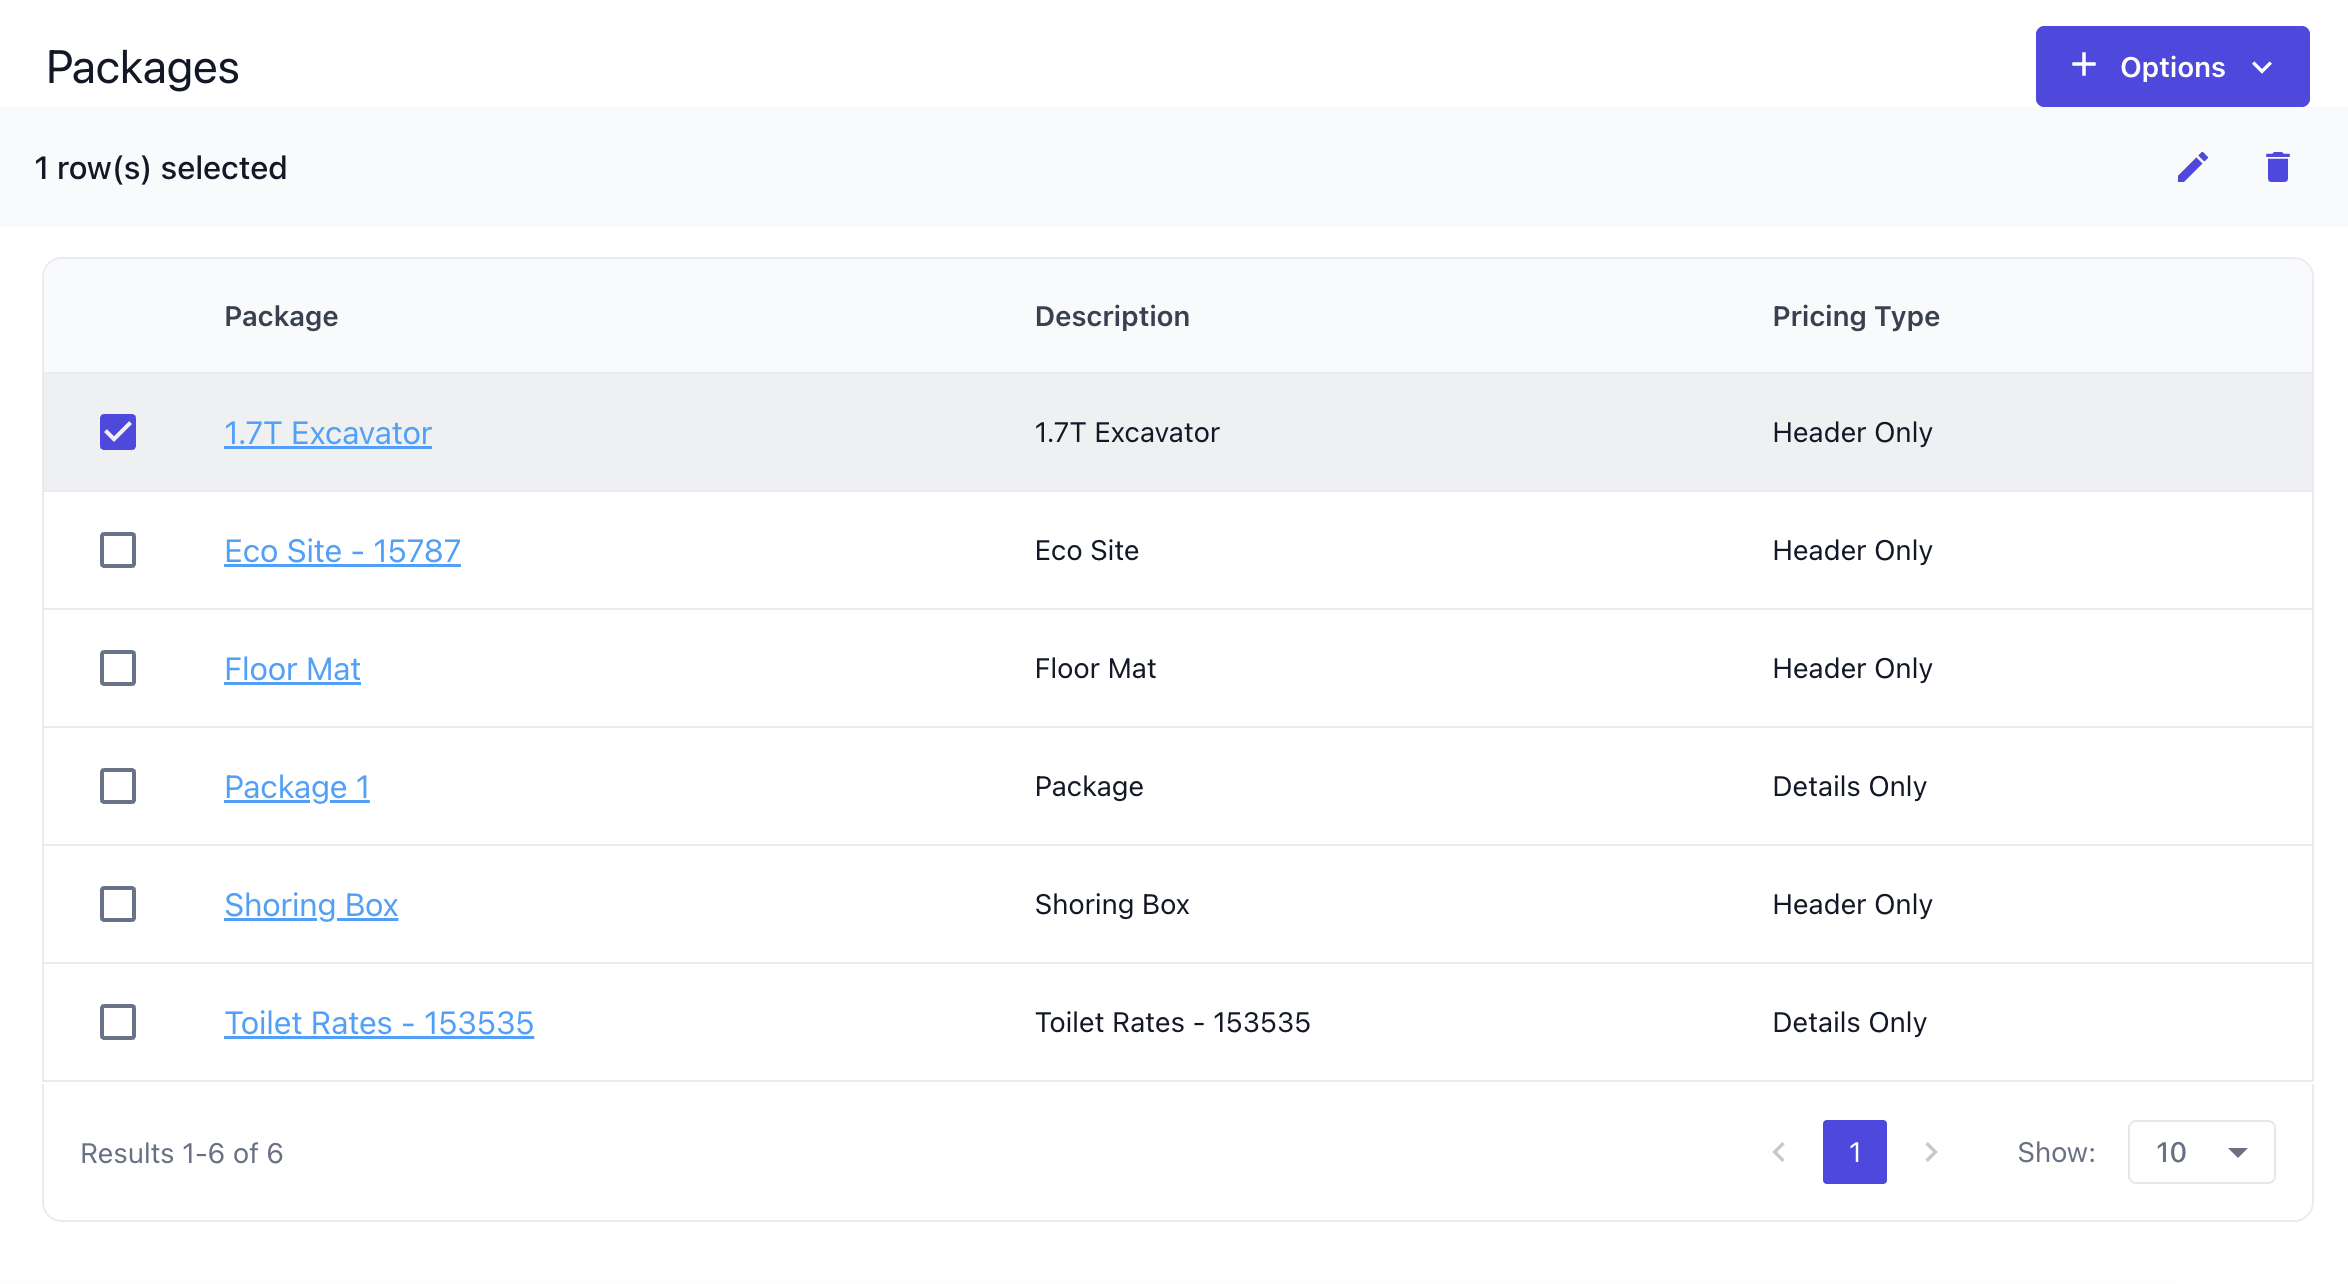
The basic configuration screen displays a straightforward list of data that can be managed. If links are available, clicking them will open the detailed configuration screen. New entries can be added through the Options menu, while some screens also allow editing or deleting existing entries by selecting the checkbox and using the corresponding icons.image-20251204-041310.png

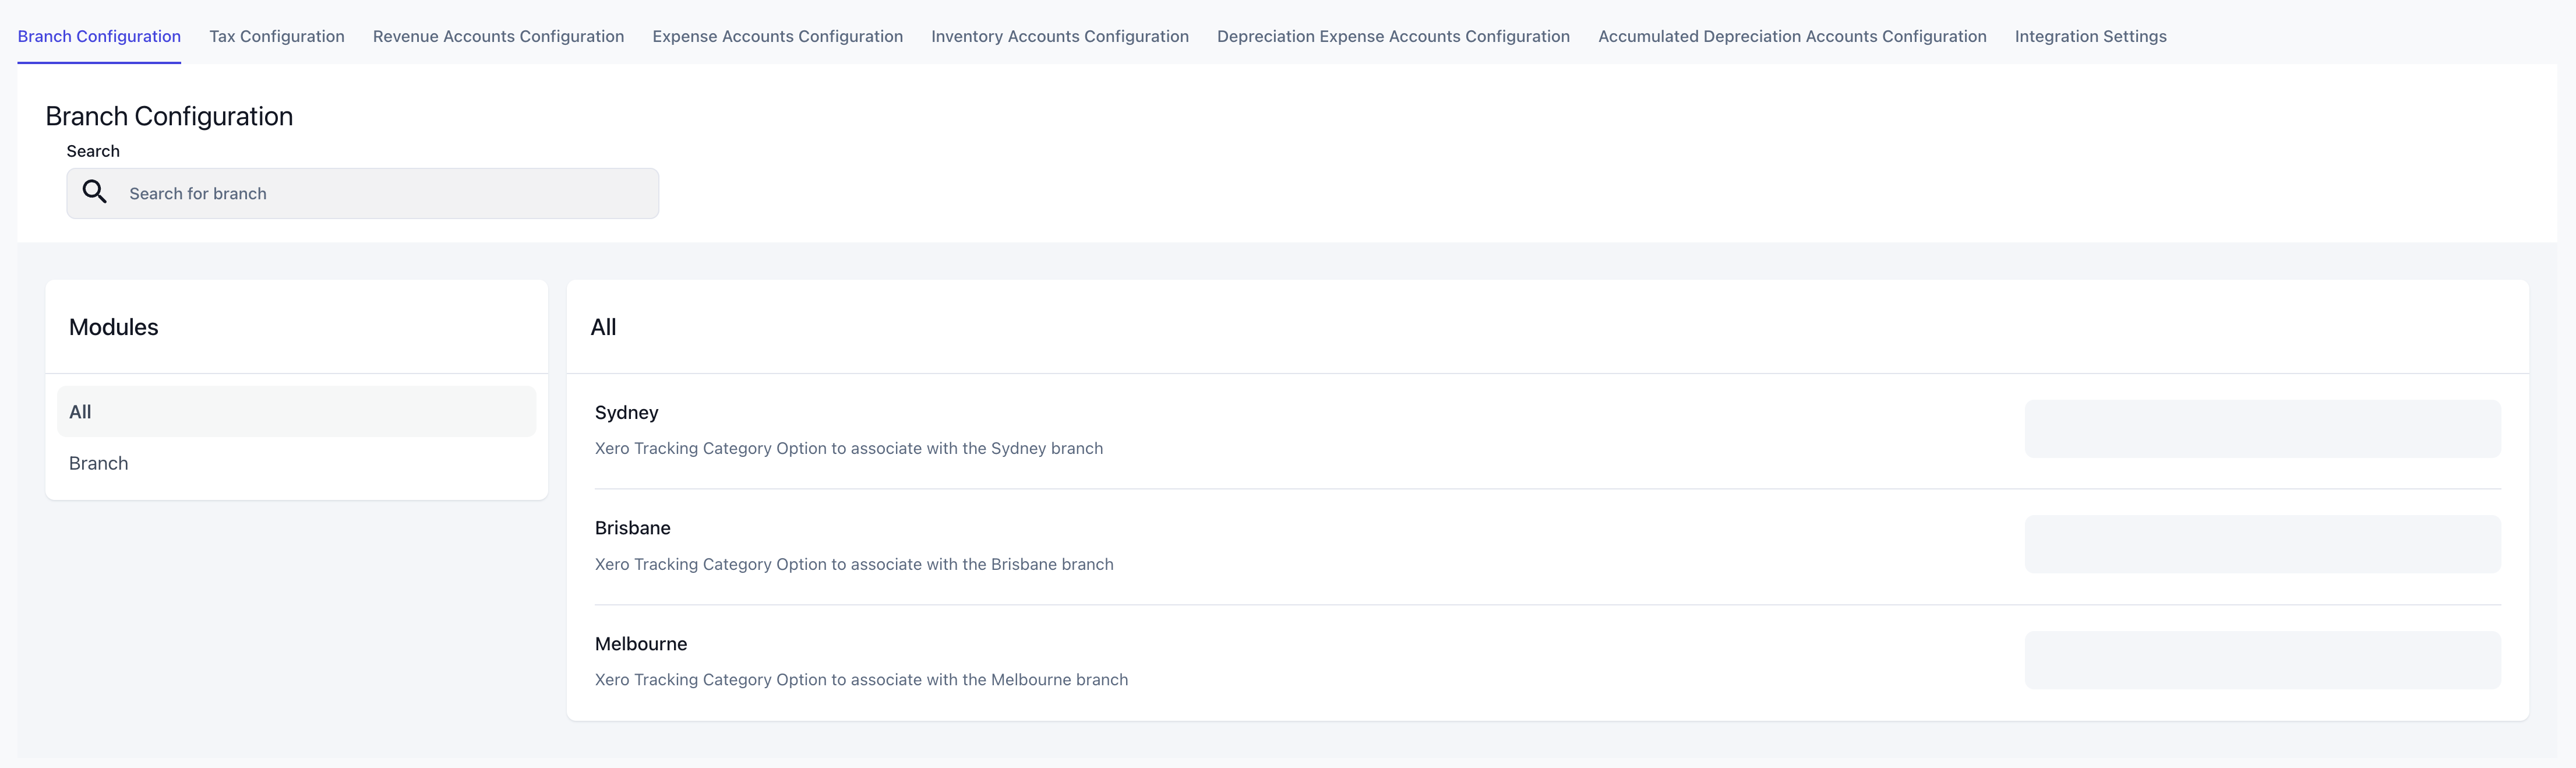
Detailed Configuration Screen

image-20251204-043438.png

Once you click on a link, it will open the specific record you want to configure. Depending on the screen, this may include general information on the top left, more specific configuration fields on the top right, and detail configurable lines on the bottom that can be configured as required. Options menu let you add more of the detail configurable lines within that configuration.

You will most likely also run into Integration Screens within the Configurations to connect to a third party software.
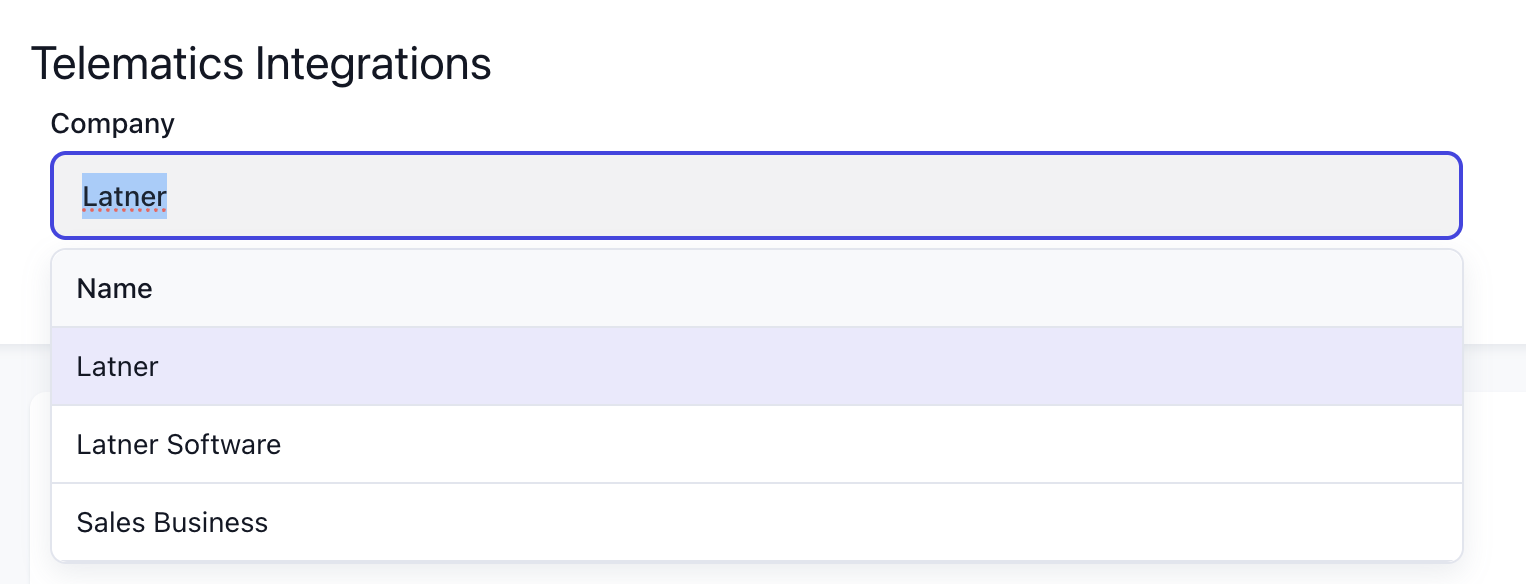
Using an Integration Screen

Company

Before using integrations, ensure your companies are set up in the top area. Most integrations support connecting multiple services per company, allowing you to tailor connections if different companies require different platforms (e.g., separate accounting systems or trackers).
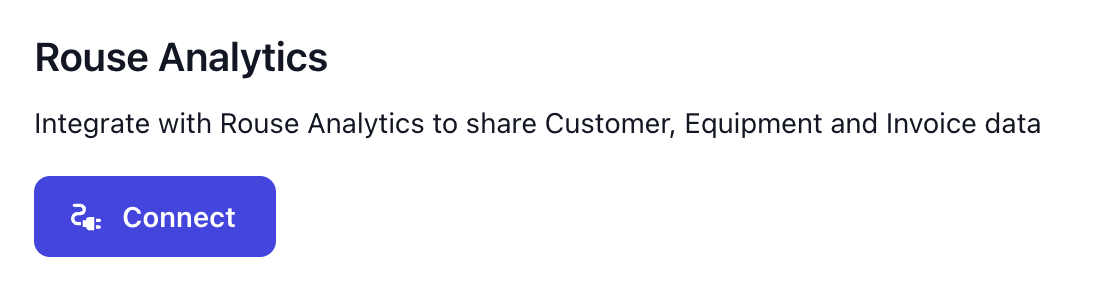
image-20251208-040217.png

Connect

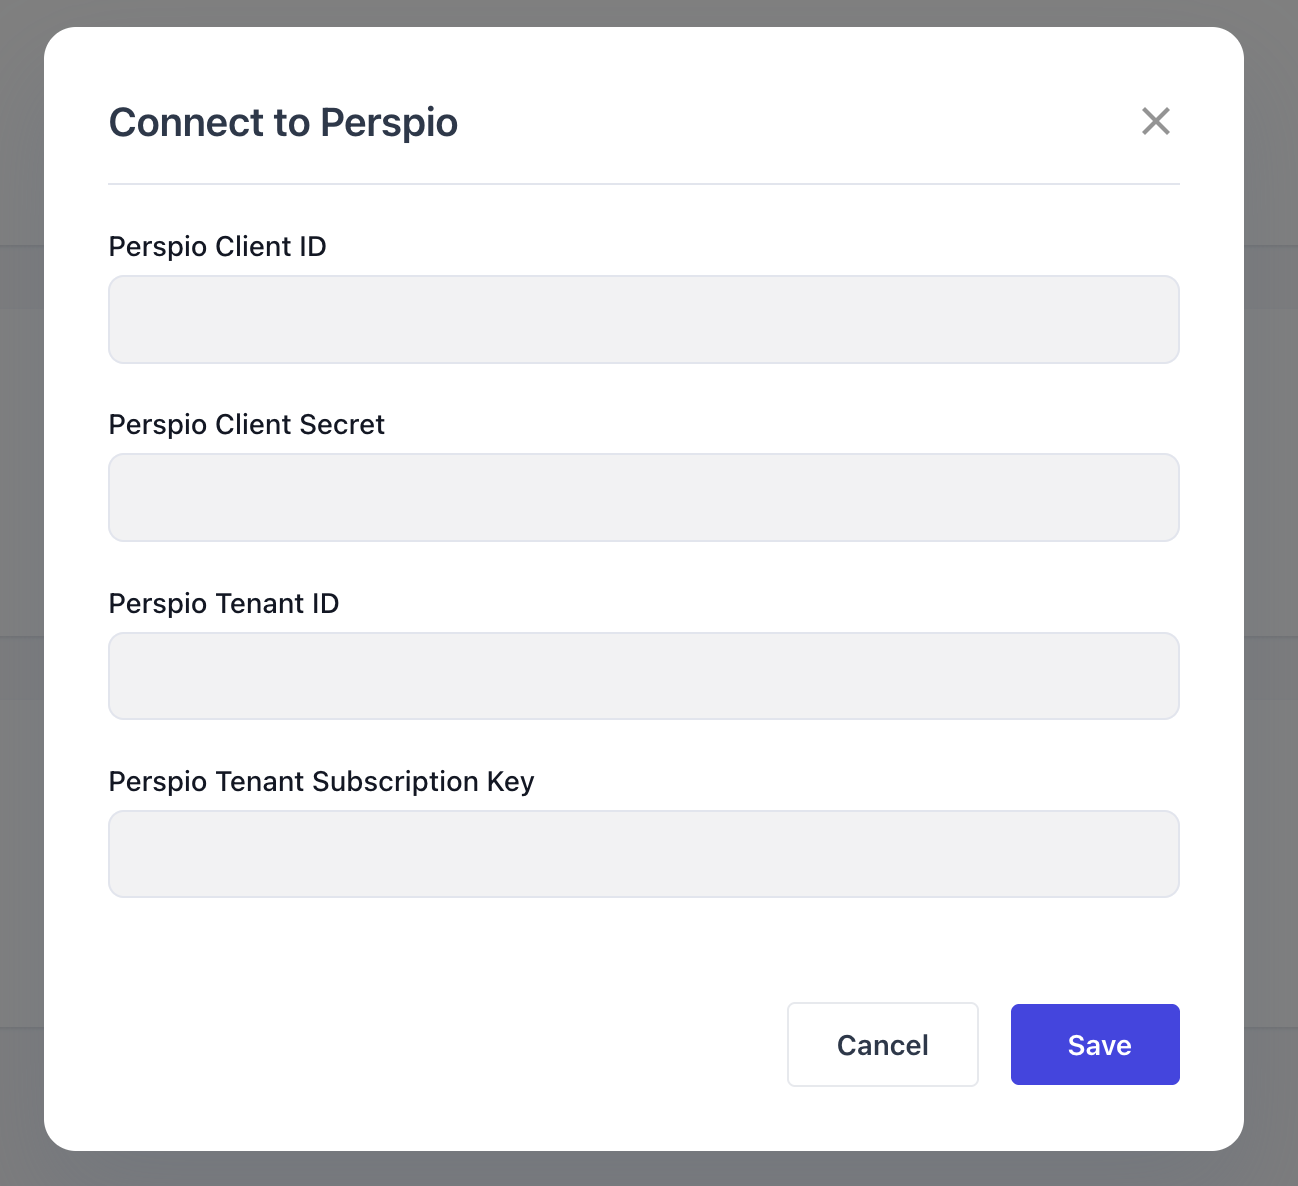
Clicking the Connect button opens a prompt to establish the link with the third‑party platform.

image-20251208-041345.png

This usually involves logging in with your account credentials, or entering a client ID and passcode provided by the external system. In some cases, the button may redirect you to the provider’s website, where you complete the login and authorise Latner to connect to the correct integration.

image-20251208-040539.png

If a connection expires or needs to be refreshed, clicking Reconnect repeats the connection process. This re‑authenticates the link with the external platform, ensuring data continues to flow correctly.

image-20251208-041801.png

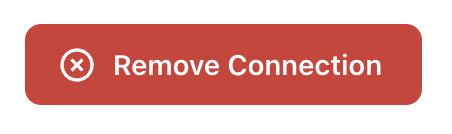
Selecting Remove Connection disconnects the integration from the company. Once removed, Latner will no longer exchange data with that external system until a new connection is established.

Configure

Some integrations include additional configuration options once connected. Click Configure to explore these options.

image-20251208-041642.png

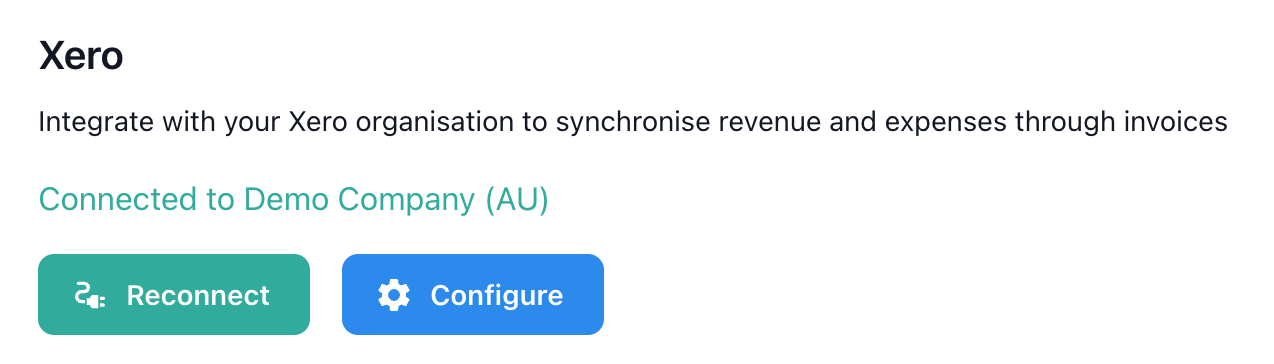
These settings define how information is exchanged between Latner and the external system - for example, mapping data fields, setting synchronisation rules, or enabling specific features. Adjusting these options ensures the integration behaves according to your operational needs.

image-20251208-041117.png

Sales Module

Pipeline Groups

Opportunity Types

Opportunity Stages

Activity Types

Industries

Call Types

Regions


Rental Module

Admin Charges

Admin Charges are used to configure one‑off fees that can be applied to charge-ons. When setting up a charge, you define:

  • Default invoice stage: whether the charge is applied on return or on the next invoice.

  • Status: active or inactive.

  • Default charge amount: the standard fee to apply.

  • Sales tax override: whether the charge is subject to GST or exempt (default is GST).

image-20251208-043239.png

This ensures that administrative fees are consistently applied and correctly taxed.


Cancel Reasons

Cancel Reasons define why a quote or contract was cancelled. Each reason includes:

  • Category: whether the cancellation is classified as “Cancelled” or “Lost.”

  • Status: active or inactive.

image-20251208-043407.png

These reasons provide visibility into cancellations and help track trends for reporting and analysis.


Labour Services

Labour Services are used to configure service charges for labour provided. Each service requires:

  • Default invoice stage: whether the service is billed on return or on the next invoice.

  • Default charge amount: the standard labour fee to apply.

image-20251208-044346.png

These settings ensure labour costs are applied consistently across contracts and invoices.


Additional Items

Additional Items are used to assign extra charges or linked items against a specific class, model, or equipment number. When creating an entry, you specify:

  • Class, model, or equipment number: where the items will be associated with.

  • Description: the purpose of the additional items.

image-20251208-045154.png

Once the entry is created, the system opens a detailed screen where you can add items to the category.

For each item, you configure:

  • Line Type: type of item to be added, can be Equipment (Class / Model), Sub Hire Equipment (Class / Model), Package, Transport, Admin, Fuel, Sanitation, Damage, Labour or Stock

  • Quantity: how many units of the item will be added.

  • Charge: the applicable fee per unit.

  • Required?: if marked as required, the item will automatically be included whenever the associated class, model, or equipment number is added to a contract.

image-20251208-045521.png

Packages

Packages are used to group multiple equipment items into a single kit that can be priced and managed together. When creating a package, you define:

  • Name of the kit: the identifier for the package.

  • Pricing type:

    • Header Only – a single‑level pricing method where you set the header price. Each detail line can then have a revenue proportion allocated against the header.

    • Detail Only – a multi‑level pricing method where each detail line has its own price defined individually.

image-20251208-052515.png

After the package is created, the system opens a detailed screen where you can add line types to the kit. For each detail line, you can specify:

  • Line Type: the type of detail line being included.

  • Quantity: the number of units.

  • Include by default?: determines if the item is automatically added when the package is used.

  • Max quantity (optional): sets a cap on how many units can be added, helping prevent undercharging.

  • Main detail line flag: identifies which line represents the package header on the contract (reserved, on rent, off hire). If not set, all lines are treated as main detail.

  • Revenue proportion or rates:

    • For Header Only pricing, you assign revenue proportions to each detail line.

    • For Detail Only pricing, you define rates directly for each line.

image-20251208-052623.png

Packages provide a structured way to manage grouped items, ensuring consistent pricing and efficient operational workflows.


Rental Rates

Rental Rates are used to create and manage customer rate cards that define how charges are applied across equipment and services. These rates are able to be assigned through Customer or Customer Sites. When creating a rental rate, you specify:

  • Level: whether the card applies to all branches or a specific branch.

  • Branch (if applicable): the branch the rate card belongs to.

  • Review date: the date the rate card should be reviewed.

  • Description: an identifier for the rate card.

image-20251209-010715.png

Once the rate card is created, the system opens a detailed screen where you can either copy the rental rates to another card or add rental details to this rental rate. Expiry dates can also be set to disable the rates accordingly through this detailed screen. Each rate detail line, you can specify

  • Line Type: the category being charged (Equipment, Package, Transport, Admin, Sanitation)

  • Equipment Class / Model / Number linked: For non‑complex charges (Transport, Admin, Sanitation), you link the charge to an Equipment Class, Model, or Number.

  • Rates / Charges:

    • Equipment & Package follow the rate system with optional floor rates to enforce

    • Transport, Admin & Sanitation lines require a single charge amount.

image-20251209-010800.png

Rental Rates provide a structured way to manage pricing across branches, customers, and items. They ensure consistency, prevent undercharging through floor rates, and give visibility into pricing variations.


Sub Hire Rental Rates

Sub Hire Rental Rates are used to create and manage supplier rate cards specifically for equipment or services sourced from external suppliers. These rate cards define how costs are applied when items are sub‑hired and are assigned through Suppliers. When creating a sub hire rental rate card, you specify:

  • Level: whether the card applies to all branches or a specific branch.

  • Branch (if applicable): the branch the rate card belongs to.

  • Review Date: the date the rate card should be reviewed for accuracy.

  • Description: an identifier or purpose for the rate card.

image-20251209-010838.png

Once the rate card is created, the system opens a detailed screen where you can add rental details to this rental rate. Expiry dates can also be set to disable the rates accordingly through this detailed screen. Each rate detail line, you can specify

  • Equipment Class: the type of equipment being sub hired.

  • Rates: follows the rate system to be charged

image-20251209-010908.png

Sub‑Hire Rental Rates ensure supplier costs are captured accurately and consistently, aligning operational decisions and maintaining profitability.


Rental Rate Variations

Rental Rate Variations let you create multiple pricing options for the same equipment / package, giving flexibility to apply the correct rate during quoting or invoicing. When setting up rental rate variations, you define the name & description to best describe the use-case.

image-20251209-011346.png

These variations are then set on the Rental Rates. Once this is done, when selecting a variation on a contract or quote, the system will display all variations for that equipment so you can choose the most appropriate one.


Sanitation Services

Sanitation Services are used to configure sanitation charges that can be applied to contracts. When setting up a sanitation charge, you define:

  • Default invoice stage: whether the charge is applied on return or on the next invoice.

  • Additional Charge: an additional charge with the sanitation consisting of Admin Charges

  • Additional Fee: the additional fee against the charge.

image-20251209-013124.png

This ensures sanitation charges are consistently applied when invoicing and ensuring that additional charges, get charged accordingly.


Lead Sources

Lead Sources are used to configure origin points for incoming leads, typically used in rental quotes, sales orders, and CRM tracking. When configuring a lead source, you define the name / description to best describe the use-case and setting the status to active or inactive to use.

image-20251209-020603.png

This ensures lead origins are consistently tracked across quoting and CRM processes, providing visibility into leads and supporting sales analysis.


Stand Down Reasons

Stand Down Reasons let you record why a rental contract has been temporarily stood down, providing visibility for reporting and analysis. When setting up a stand down reason, you define the name and description to best describe the scenario.

image-20251209-022751.png

These reasons are then applied to rental contracts whenever a stand down occurs. Once selected, the system records the reason against the contract, ensuring accurate tracking and allowing trend analysis.


Transport Runs


Rental Quote PDF Template


Rental Contract PDF Template


Equipment Module

Categories

Equipment Categories are used to configure broad groupings of equipment types. When setting up a category, you define the name and description.

image-20251209-033834.png

Classes

Equipment Classes are used to define sub-groups within a category, typically based on size, function, or operational role. When setting up a class, you define:

  • Category: the parent category this class belongs to

  • Default charge days per week: sets the standard billing cycle for the equipment with this class

  • Meter type: Specifies the type of usage meter used to track equipment activity

  • Run‑up inspection: flags if inspection is required when the equipment with the same class is put on hire; checklist can optionally be added on detail screen

  • Return inspection: flags if inspection is required when the equipment with the same class has returned; checklist can optionally be added on detail screen

image-20251209-040522.png

Once the class is created, the system opens a detailed screen where you can configure:

  • Damage waiver: defines the damage waiver on class level; can be set per hierarchy.

  • Default charge days per week: sets the standard billing cycle for the equipment with this class

  • Default inspection time: establishes the expected time allocation for inspections

  • Meter type: Specifies the type of usage meter used to track equipment activity

  • Run‑up inspection: flags if inspection is required when the equipment with the same class is put on hire; checklist can optionally be added on detail screen

  • Return inspection: flags if inspection is required when the equipment with the same class has returned; checklist can optionally be added on detail screen

  • Equipment transfer checklist: flags if inspection is required when the equipment with the same class has transferred branches; checklist can optionally be added

  • Pre‑start checklist: set a checklist template for operators to complete on an operator docket before starting equipment with the same class

  • Account depreciation type: defines how the equipment with the same class is depreciated for accounting purposes

  • Tax depreciation type: specifies the depreciation method used for tax reporting, ensuring compliance with regulations

  • Minimum markup for sub‑hire: sets the minimum profit margin applied when equipment is sub‑hired from a supplier, preventing undercharging.

image-20251209-040711.png

You can also add service schedules against the class, where you define:

  • Schedule start date: the date the service schedule begins

  • Service schedule group: groups related schedules together for calculating frequency how one schedule that takes over after another

  • Recurring frequency: determines how often the service occurs, based on hours meter, days, or both

  • One‑off schedule flag: marks the schedule as a single occurrence rather than recurring

  • Work Order Reason and Category: classifies the service work order for operational reporting

  • Create Checklist flag: either generates a new checklist for the schedule or links an existing checklist template to this schedule

See more detailed information on How to Assign a Service Schedule to an Equipment

image-20251209-040807.png

Makes

Equipment Makes are used to configure the manufacturer or brand of the equipment. When setting up a make, you define the name and description.

image-20251209-040853.png

Models

Equipment Models are used to define the specific version of equipment within a class and make. When setting up a model, you define the name / description and the following:

  • Class: the equipment class the model belongs to

  • Make: the manufacturer or brand it links to

  • Run‑up inspection: flags if inspection is required when the equipment with the same model is put on hire; checklist can optionally be added; takes over what is set on class

  • Return inspection: flags if inspection is required when the equipment with the same model has returned; checklist can optionally be added; takes over what is set on class

image-20251209-042045.png

Once the model is created, the system opens a detail screen where you can configure:

  • Default charge days per week: sets the standard billing cycle for the equipment with this class; takes over what is set on class

  • Default inspection time: establishes the expected time allocation for inspections; takes over what is set on class

  • Fuel type: identifies the fuel required for the equipment with the same model

  • Run‑up inspection: flags if inspection is required when the equipment with the same model is put on hire; checklist can optionally be added; takes over what is set on class

  • Return inspection: flags if inspection is required when the equipment with the same model has returned; checklist can optionally be added; takes over what is set on class

  • Equipment transfer checklist: flags if inspection is required when the equipment with the same model has transferred branches; checklist can optionally be added; takes over what is set on class

  • Pre‑start checklist: set a checklist template for operators to complete on an operator docket before starting equipment with the same model; takes over what is set on class

image-20251209-042233.png

You can also add service schedules against the class, where you define:

  • Schedule start date: the date the service schedule begins

  • Service schedule group: groups related schedules together for calculating frequency how one schedule that takes over after another

  • Recurring frequency: determines how often the service occurs, based on hours meter, days, or both

  • One‑off schedule flag: marks the schedule as a single occurrence rather than recurring

  • Work Order Reason and Category: classifies the service work order for operational reporting

  • Create Checklist flag: either generates a new checklist for the schedule or links an existing checklist template to this schedule

See more detailed information on How to Assign a Service Schedule to an Equipment

image-20251209-043337.png

Within the Model detail screen, you can configure Portal Documentation that customers can access through the public portal via QR code or link. You can upload documents against their types, these documents become visible to customers through the portal, ensuring they have direct access to the correct information for the equipment.

image-20251209-043625.png

Fuel Types

Fuel Types are used to configure the type of fuel along with the associated costs and charges. When setting up a fuel type, you define:

  • Cost: the internal cost of the fuel

  • Charge: the fee applied to customers when fuel is billed

image-20251209-044405.png

This ensures that fuel usage is consistently recorded, correctly charged, and visible in both operational and financial reporting.


Bulk Equipment Adjustment Reasons

Bulk Equipment Adjustment Reasons are used to configure categories for bulk equipment adjustments, providing clarity and consistency when large groups of equipment records are updated. When setting up an adjustment reason, you define the name, description and status.

image-20251209-230416.png

Disposal Reasons

Disposal Reasons are used to configure categories for equipment disposals, providing clarity and consistency when assets are retired or removed from service. When setting up a disposal reason, you define name and description.

image-20251210-005557.png

Transfer Reasons

Transfer Reasons are used to configure categories for equipment transfers between branches, ensuring clarity and consistency when assets are moved across locations. When setting up a disposal reason, you define name and description.

image-20251210-010321.png

Portal Documentation Types

Portal Documentation Types are used to configure categories for documents that can be uploaded and made available to customers through the public portal (via QR code or link). These types act as the framework against which specific documents are stored, ensuring consistency and easy access. When setting up a portal documentation type, you define name and status.

image-20251210-010903.png

Checklist Templates

Checklist Templates are used to configure standardised checklists that can be imported, exported, or created directly within the system. These templates ensure consistency across inspections, service schedules, and operational processes.

When adding a checklist details, you define:

  • Type: the category of checklist. Available types include:

    • Service: used for scheduled service tasks

    • Run‑up inspections: performed before equipment is put on hire

    • Return inspections: completed when equipment is returned

    • Equipment transfer inspections: applied when equipment is moved between branches

    • Pre‑sale inspections: carried out before selling equipment

    • Pre‑start inspections: completed by operators before starting equipment

  • Name: the identifier for the checklist.

  • Task list: a structured list of tasks, including:

    • Group: tasks grouped together for PDF output.

    • Task summary: a short label for the task.

    • Task description: detailed instructions for completing the task.

    • Photo required: whether a photo must be attached to complete the task.

image-20251210-013005.png

Telematics Integrations

Telematics Integrations are used to connect the system to third‑party tracker software, enabling automated equipment tracking and data syncs. These integrations ensure that fleet and asset information remains accurate and up to date.

When setting up a telematics integration, you define:

  • Company: the company that will use the tracker software.

  • Connection credentials: the ID and password required to connect, which vary depending on the tracker software configuration.

Once configured, clicking the Connect button will prompt you to enter the required credentials. The connection process differs by provider, with specific steps available for supported trackers such as Teletrack, Trackunit, and Perspio.

image-20251211-233924.png

Service Module

Reasons

Reasons are used to configure the top‑level categorisation for Work Orders, identifying the purpose of each job. These reasons define why a work order is created and provide a structured way to classify operational activities. When setting up a work order reason, you define the name and description.

image-20251212-003705.png

Categories

Categories are used to configure sub‑classifications under Work Order Reasons, providing greater detail and structure when categorising jobs. They allow work orders to be grouped more specifically within a reason, ensuring clarity in reporting and operational tracking. When setting up a category, you define the parent reason it links to, name and description.

image-20251212-003854.png

Skills


Skilled Persons


Skilled Person Rate Books


Service Request Types


Service Request Statuses


Timesheet Groups


Timesheet Sub Groups


Stock Module

Stock Types


Group


Sub Group


Stock Adjustment Reasons


Customers Module

Sales Reps


Payment Terms


Customer Categories


Credit Note Approval Groups


Insurance Companies


Insurance Types


Suppliers Module

Expense Types


Financials Module

Companies


Divisions


Branches


Warehouse


Sales Tax


Purchase Tax


Asset Groups


Depreciation Types


Accounting Integration


Payment Gateway Integration


Rouse Integration


Purchase Order Approval Groups


Financials Report Config


Purchase Order PDF Templates


Security Module

Permission Groups


Notification Groups


Webhook Integrations


JavaScript errors detected

Please note, these errors can depend on your browser setup.

If this problem persists, please contact our support.